Unity Build systems pt 2
Building unity with TeamCity, prepping artifacts etc
Where we left off last time we had set up TeamCity, configured out Perforce depot and were starting to add some build steps to actually build the project.
To refresh:
we created a project
created a build configuration
Added our Version Control System (Perforce) to the configuration
Next we need to add the first of a couple of build steps!
Open the build config, and as you can see it prompts us to add some build steps.
If you click ‘Add Build Step’, this will open a huge list of potential build runners that are built into TeamCity. Unfortunately Unity isn’t in the list ;{
Adding Unity Build support to TeamCity
We’re in luck though! TeamCity does have a plugin that provides Unity build support out of the box, so let’s download that and set it up!
First, download the Unity plugin from the Jetbrains Marketplace here.
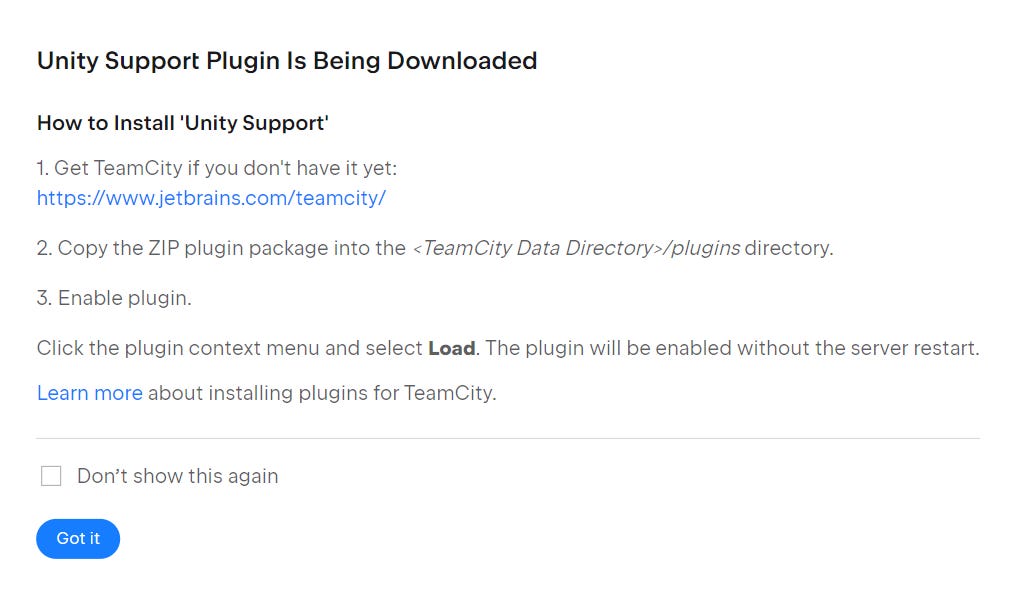
The download link will show you these instructions:
Which seems fairly straightforward, no? We already have step 1 completed (woohoo), so let’s go through the rest.
Let’s download the zip (into downloads or wherever) by clicking ‘got it’ and then copy it (the entire zip file) into the directory specified above. In my case, I set the TeamCity data directory (during the initial installation) onto my D: drive, so after I’ve copied the file, it looks like this:
Now that it’s ‘installed’ we can go to ‘Administration’ (upper right of the TeamCity UI) and select Plugins from the list
And look at that! TeamCity is smart enough to recognize that we just installed a new plugin! Click ‘Enable Uploaded Plugins’
This will prompt TeamCity to ask nicely if we actually wanted to do this, which we do.
Once you’ve done that TeamCity should show you the Unity plugin listed under ‘External Plugins’ and we’re good to go!
Adding a Unity build step to our Project
Now we can go back to our Build configuration by clicking the arrow beside ‘projects’ in the upper left. You will see your project and the build config underneath, like so:
Select the build config and then ‘Edit Configuration’ to get back to where we were before.
This time, if we go to Build Steps and add a build step, you will see Unity in the list of available build steps!
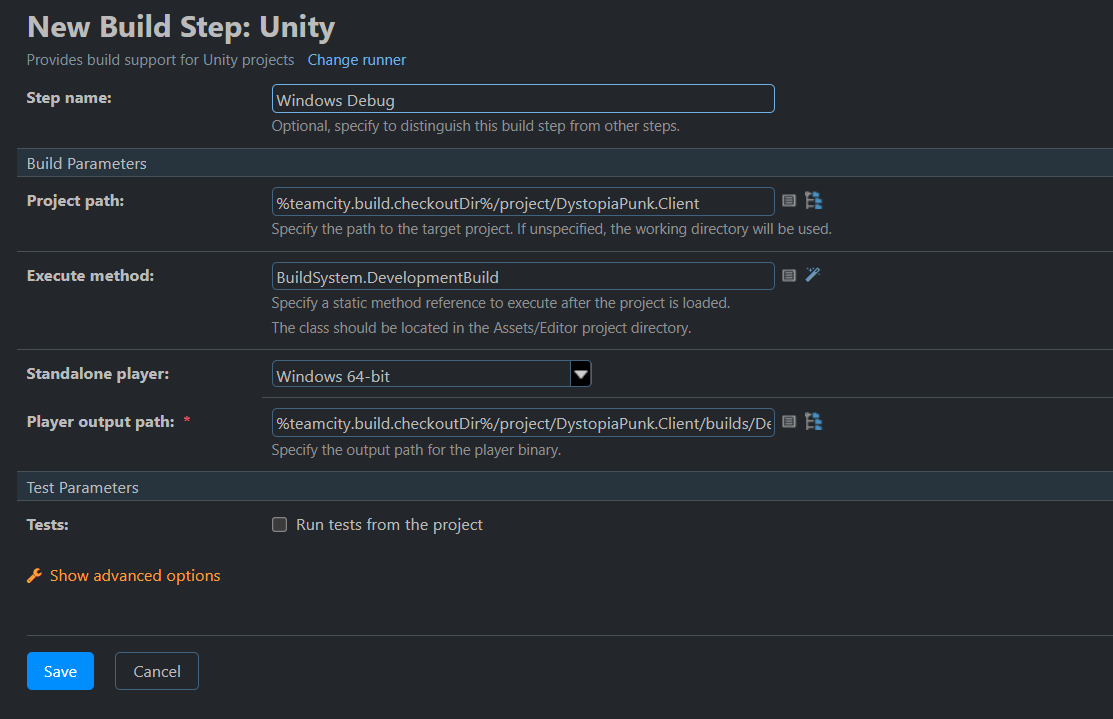
Add a Unity build step. By default, the build step only has a few options, show below:
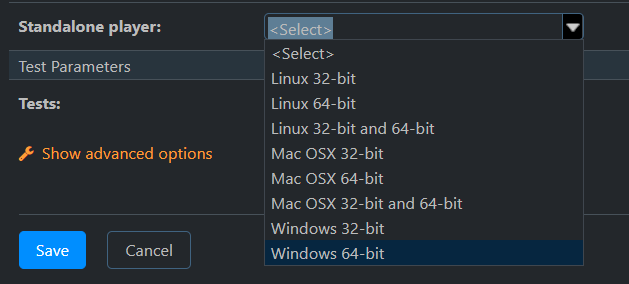
First, name your build step “Windows Debug” (since this is my debug build config) and choose what platform you want to build from the Standalone Player list. In my case I want to build a Windows 64-bit exe (since it will go up on Steam).
Finally for the project path, this will be the relative path within your Perforce depot, prefixed by a predefined parameter that TeamCity gives us.
If you click the first icon beside Project Path you will get a dropdown of all of the TeamCity parameters that we have access to.
The great thing about these parameters is that you can use them just about anywhere in your build steps and TeamCIty will automatically populate the ‘actual’ value when running the build.
For our Project Path, let’s use the %teamcity.build.checkoutDir% parameter as the root of the path and then add whatever else we need to tell TeamCity where our Unity project is located within our Perforce depot.
In my case, it is :
%teamcity.build.checkoutDir%/project/DystopiaPunk.Client
Next, let’s specify our player output path, which is where Unity will actually build the project to.
Here’s what I have mine set to:
%teamcity.build.checkoutDir%/project/DystopiaPunk.Client/builds/Debug/
This will build the project into a /builds/Debug subfolder of the actual Unity project. We’ll need to remember this for the next step!
Adding a Custom Unity Build Script
If you run your build from here, TeamCity will open the editor and try to build your project, however I am going to go one step further and configure a custom build script that Unity will run instead of using the default build setting.
In the above screenshot you can see the ‘Execute method’ parameter.
From the Unity docs:
Execute the static method as soon as Unity opens the project, and after the optional Asset server update is complete. You can use this for tasks such as continuous integration, performing Unit Tests, making builds or preparing data.
To return an error from the command line process, either throw an exception which causes Unity to exit with return code 1, or call EditorApplication.Exit with a non-zero return code.
To pass parameters, add them to the command line and retrieve them inside the function usingSystem.Environment.GetCommandLineArgs. To use-executeMethod, you need to place the enclosing script in an Editor folder. The method you execute must be defined as static.
Basically what this means is that if you have a script with a static method, defined like so:
public static void DevelopmentBuild()
{
    buildNumber = GetBuildVersionFromCommandLine();
    BuildPlayer(BuildType.Development, buildNumber);
}
You can call it by adding a parameter to your build like so:
-executeMethod Classname.MethodName
That’s basically what the TeamCity parameter will do - call whatever method you specify.
I’ve shared the BuildSystem script that I use for my projects as a Github Gist here
It isn’t fancy, but it does the trick.
If you download that script and save it into an Editor folder in your project as BuildSystem.cs, it will add a couple of menu items into your project like so:
And also be available to call these methods from TeamCity:
BuildSystem.DevelopmentBuild
BuildSystem.ReleaseBuild
BuildSystem.DebugScriptsOnlyBuild
BuildSystem.ReleaseScriptsOnlyBuild
They do what you would expect.
So, for our TeamCity build step we simply enter the method that we want to call, like so:
There are a few other options hidden under the ‘Show Advanced Options’ link at the bottom, let’s open them up and take a look:
We can leave most of these empty, however I AM interested in saving a copy of the build log in a place that we can find it later (by default, Unity overwrites the Editor.log every time it is opened up) - let’s add a custom log path to save the log file into the same directory as our builds, like so:
%teamcity.build.checkoutDir%/project/DystopiaPunk.Client/Builds/Debug/Editor.log
My full build step is shown below!
When we hit ‘Save’, TeamCity gives us this exciting message!
Woohoo!
Now we do have some additional steps involved before we are complete, but this is good for this post!
Feel free to run your first build and (fingers crossed), you’ll get happy messages like this!
If not, don’t worry! Next time we’ll go through how to troubleshoot builds that aren’t working and look at prepping our builds to publish to Steam!
Until then!


